Difference between revisions of "IODD-2531"
m |
m |
||
| Line 20: | Line 20: | ||
## ''LCD Bright'' - Adjust LCD back-light bright | ## ''LCD Bright'' - Adjust LCD back-light bright | ||
## ''Idle Bright'' - Adjust LCD back-light bright in power down mode | ## ''Idle Bright'' - Adjust LCD back-light bright in power down mode | ||
| − | ## ''Standby time'' - Adjust the inactive time before power down mode is | + | ## ''Standby time'' - Adjust the inactive time before power down mode is active |
## ''Load Default'' - Restoring all settings to their default values | ## ''Load Default'' - Restoring all settings to their default values | ||
# '''''Information''''' | # '''''Information''''' | ||
| Line 63: | Line 63: | ||
# Create or Copy ''*.ISO *.VHD *.RMD *.IMA'' or sub folder tree to ''_ISO'' folder | # Create or Copy ''*.ISO *.VHD *.RMD *.IMA'' or sub folder tree to ''_ISO'' folder | ||
# Do [http://windows.microsoft.com/en-US/windows7/Safely-remove-devices-from-your-computer safely remove] the iODD in OS. ( Very Important ) | # Do [http://windows.microsoft.com/en-US/windows7/Safely-remove-devices-from-your-computer safely remove] the iODD in OS. ( Very Important ) | ||
| − | # If Power Down mode is | + | # If Power Down mode is active then release and reconnect the USB cable. |
#* If not then press down the jog button in 3 seconds. and Power Down mode will be on. | #* If not then press down the jog button in 3 seconds. and Power Down mode will be on. | ||
#* and if ''Plug Out ...'' message is out, release and reconnect the USB cable. | #* and if ''Plug Out ...'' message is out, release and reconnect the USB cable. | ||
| Line 76: | Line 76: | ||
# Copy your ISO files to ''_ISO'' folder or sub folder. | # Copy your ISO files to ''_ISO'' folder or sub folder. | ||
# Do [http://windows.microsoft.com/en-US/windows7/Safely-remove-devices-from-your-computer Safely Remove] in your OS. ('''necessary''' in NTFS ) | # Do [http://windows.microsoft.com/en-US/windows7/Safely-remove-devices-from-your-computer Safely Remove] in your OS. ('''necessary''' in NTFS ) | ||
| − | # If Power Down mode is not | + | # If Power Down mode is not active then press down the jog button in 3 seconds. and Power Down mode will be on. |
#* If ''Plug Out ...'' message is out, release the iODD. | #* If ''Plug Out ...'' message is out, release the iODD. | ||
# Connect iODD to your PC and power on the PC. | # Connect iODD to your PC and power on the PC. | ||
| Line 87: | Line 87: | ||
* If your PC is old or does not provide multi LUN, please select ''CD-MODE'' in Menu. | * If your PC is old or does not provide multi LUN, please select ''CD-MODE'' in Menu. | ||
* In order to confirm whether the ISO file is not good for booting, try to test it with the validated PC. | * In order to confirm whether the ISO file is not good for booting, try to test it with the validated PC. | ||
| − | * Although bootable ISO file, it may not boot with | + | * Although it is bootable ISO file, it may not boot with USB DVD-ROM. test if it is same result with USB DVD-ROM. |
| − | * | + | * If It can boot in USB DVD-ROM and can not boot in iODD, please use USB Y-CABLE for adding external power. |
| − | * | + | * If your laptop has own internal DVD-ROM and iODD does not boot, please disable internal DVD-ROM at booting device list on BIOS settings or remove it. |
| − | === | + | === Using Virtual USB fixed disk drive (Virtual Hard Disk) === |
| − | * | + | * Only fixed VHD file is acceptable. (Not dynamic VHD nor VHDx files) |
| − | * | + | * Make VHD files directly by [[VHD Tool++]]. (VHD Tool++ can make a file without fragment) |
| − | + | * Press Jog dial to select VHD file and iODD will be rebooted with ''CD-MODE'' and is recognized as USB disk drive (Virtually). | |
| − | * | + | |
* ''DUAL-MODE'' 와 ''Write Protect''(쓰기방지) 유무를 지정하고 싶다면 VHD 파일이름을 변경하면 된다. [[VHD Tool++]] 참조. | * ''DUAL-MODE'' 와 ''Write Protect''(쓰기방지) 유무를 지정하고 싶다면 VHD 파일이름을 변경하면 된다. [[VHD Tool++]] 참조. | ||
* 최대 4개의 가상 드라이브를 동시에 선택할수 있다. (파일 하나 선택후에 3초 안으로 다른 파일을 선택함) | * 최대 4개의 가상 드라이브를 동시에 선택할수 있다. (파일 하나 선택후에 3초 안으로 다른 파일을 선택함) | ||
| Line 105: | Line 104: | ||
# 컴퓨터가 부팅 장치를 못찾을 경우 ''Ctrl-Alt-Del'' 을 눌러 재부팅 한다. | # 컴퓨터가 부팅 장치를 못찾을 경우 ''Ctrl-Alt-Del'' 을 눌러 재부팅 한다. | ||
| − | === | + | === Using Virtual USB 이동식 플레시 메모리 (Virtual USB Flash Drive) 이용 === |
* 위의 VHD 활용 방법과 거의 같고 단지 파일명만 RMD 로 수정하면 된다. | * 위의 VHD 활용 방법과 거의 같고 단지 파일명만 RMD 로 수정하면 된다. | ||
* 이 방법을 이용하면 이동식 USB 드라이브로 인식된다. | * 이 방법을 이용하면 이동식 USB 드라이브로 인식된다. | ||
Revision as of 17:27, 20 May 2016
Contents
Appearance
Functions
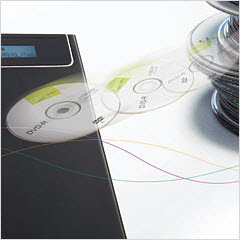
- Bootable Virtual CD-ROM, DVD-ROM, Blu-ray Drive
- There is no need to buy DVD-ROM and blank media for OS installation.
- ISO (CD, DVD, Blu-ray) is supported.
- Bootable Virtual USB Drive and Flash Drive.
- iODD supports OS installation and Multi Booting. (and "Windows-To-Go")
- Virtual Disk Drive - can do all functions as USB Flash Drive can do
- VHD and VMDK (Virtual Disk Drive), RMD (Virtual Flash Drive), IMA (Virtual Floppy Disk Drive) are supported.
- Multi LUN
- max 1 optical drive, 1 hard drive, 4 virtual drives are supported at the same time.
- hotkey for safely removal.
- The last physical safeguard. this key provides the safe removal.
- Write Protection
- The last logical safeguard. I keep my drive. Good bye Virus.
- Optional Write Blocker. (Hard wired)
- Real-time AES 256-bit XTS Military Grade Encryption ( iODD-2541 )
- 4-15 Pin digits. 6 digits is enough for protecting your data. (against the developer of iODD-2541)
- All functions work well with Encryption
- Encryption is optional. you can use without encryption.
- Maintain Loading State
- Save and maintain the loading state and menu for next boot.
Menu
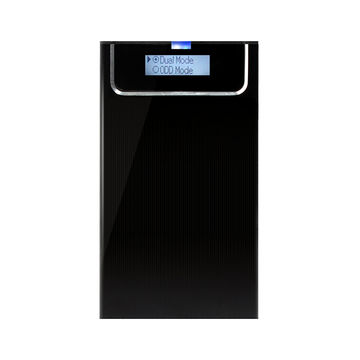
- Mode-Select - Define USB devices mode
- Dual Mode - 1 Disk Drive and 1 Optical Disk Drive
- HDD Mode - 1 Disk Drive
- CD Mode - 1 Optical Disk Drive
- Setting
- LCD Bright - Adjust LCD back-light bright
- Idle Bright - Adjust LCD back-light bright in power down mode
- Standby time - Adjust the inactive time before power down mode is active
- Load Default - Restoring all settings to their default values
- Information
- S.M.A.R.T. - Display the following status of the internal Disk Drive
- HDD Temp - Disk Drive Temperature
- HDD Health - Disk Drive Health
- HDD Model - Disk Drive Model
- HDD Serial - Disk Drive Serial
- Firmware Ver - iODD's Firmeare Version
- USB Speed - Currently connected USB Speed
- USB Input Volt - USB BUS voltage (Both Current and Minimum )
- S.M.A.R.T. - Display the following status of the internal Disk Drive
- USB Connect
- Refreah - Reconnect the iODD
- Safe Removal - Stop the spindle motor and power down the Disk Drive
- Advanced
- Umount VHDD - Umount All the Virtual Disk Drives
- Write Protect - Write Protect the internal Disk Drive (Not Virtual Drive)
- Instant Save -
- Force USB 3.0 - Preserve USB 3.0 connection in harsh conditions
Specifications
- External Interface - USB 1.1 / 2.0 / 3.0 (MAX 5G bps)
- Internal Interface - SATA 1.0 / 2.0 / 3.0 (Backward Compatible)
- 2.5" HDD, SSD (9.5mm width) can be installed.
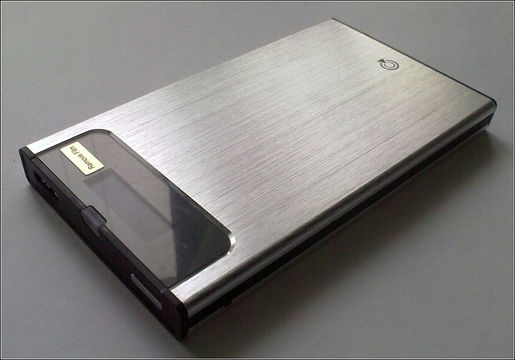
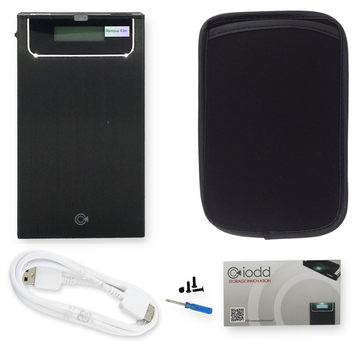
- 3-way jog switch, Back Button, USB 3.0 micro B-Type connector.
- LCD - 128 * 32 dots.
- Material - Aluminum, PC (Plastic).
How to use
- At first please refer to the below Manual.
Initialize
- Two sorts of the firmware are NTFS version and FAT32/exFAT version.
- NTFS firmware version is shipped.
- If you want FAT32 or exFAT Partition, download and update the NTFS Firmware Updater.
- Follow the next steps
- Assemble the HDD or SSD with iODD
- Connect the iODD to PC
- Initialize the drive with MBR
- Format the first partition with NTFS. (if the firmware is FAT then format with FAT32 or exFAT)
- At FAT32 there is 4G byte file size limitation. please expert may use FAT32.
- Make _ISO folder in root folder. (not sensitive)
- Create or Copy *.ISO *.VHD *.RMD *.IMA or sub folder tree to _ISO folder
- Do safely remove the iODD in OS. ( Very Important )
- If Power Down mode is active then release and reconnect the USB cable.
- If not then press down the jog button in 3 seconds. and Power Down mode will be on.
- and if Plug Out ... message is out, release and reconnect the USB cable.
- you will see Sequentially iodd 2531 and a file name in root folder.
- If it is not like the above, follow the next
- Release the USB cable.
- Replace the HDD from iODD.
- Initialize the HDD with GPT
- Go to #Initialize(1, the first step) and retry (MBR -> GPT -> MBR).
Using Virtual USB Optical Drive (DVD-ROM or Blu-ray ROM)
- Copy your ISO files to _ISO folder or sub folder.
- Do Safely Remove in your OS. (necessary in NTFS )
- If Power Down mode is not active then press down the jog button in 3 seconds. and Power Down mode will be on.
- If Plug Out ... message is out, release the iODD.
- Connect iODD to your PC and power on the PC.
- (Optional) Make iODD or USB CD-ROM the first in the priority of BOOT sequence in BIOS.
- (Not required if an ISO has been selected) Select an ISO file by Jog dial.
- If Firmware version is 1558 or higher then loading status is automatically saves. if not, you must save it manually by pressing down jog dial in 3 Seconds
- If PC will not find booting device (iODD) then Press Ctrl-Alt-Del to reboot.
Troubleshooting
- Confirm the ISO file whether it is bootable.
- If your PC is old or does not provide multi LUN, please select CD-MODE in Menu.
- In order to confirm whether the ISO file is not good for booting, try to test it with the validated PC.
- Although it is bootable ISO file, it may not boot with USB DVD-ROM. test if it is same result with USB DVD-ROM.
- If It can boot in USB DVD-ROM and can not boot in iODD, please use USB Y-CABLE for adding external power.
- If your laptop has own internal DVD-ROM and iODD does not boot, please disable internal DVD-ROM at booting device list on BIOS settings or remove it.
Using Virtual USB fixed disk drive (Virtual Hard Disk)
- Only fixed VHD file is acceptable. (Not dynamic VHD nor VHDx files)
- Make VHD files directly by VHD Tool++. (VHD Tool++ can make a file without fragment)
- Press Jog dial to select VHD file and iODD will be rebooted with CD-MODE and is recognized as USB disk drive (Virtually).
- DUAL-MODE 와 Write Protect(쓰기방지) 유무를 지정하고 싶다면 VHD 파일이름을 변경하면 된다. VHD Tool++ 참조.
- 최대 4개의 가상 드라이브를 동시에 선택할수 있다. (파일 하나 선택후에 3초 안으로 다른 파일을 선택함)
- VHD Tool++ 를 이용하여 iODD 의 _ISO 폴더 밑에 만든다.
- 완료되면 OS 상에서 안전 제거를 한다 (NTFS 일경우 필수)
- 부팅 하려는 컴퓨터에 연결한후 전원을 켠다.
- (선택, 이미 상태가 저장 되었다면 스킵) 조그 버튼을 이용해서 VHD 파일을 선택한다.
- (선택) 바이오스 모드에 들어가서 부팅 순서를 iODD 나 USB Drive를 최우선으로 변경한다.
- 컴퓨터가 부팅 장치를 못찾을 경우 Ctrl-Alt-Del 을 눌러 재부팅 한다.
Using Virtual USB 이동식 플레시 메모리 (Virtual USB Flash Drive) 이용
- 위의 VHD 활용 방법과 거의 같고 단지 파일명만 RMD 로 수정하면 된다.
- 이 방법을 이용하면 이동식 USB 드라이브로 인식된다.
가상 플로피 (Virtual FDD) 이용
- 모든 컴퓨터에서 이 방법이 지원 되는것이 아닙니다.
- 비압축 플로피 이미지 IMA, IMG, BIF, VFD 사용 가능합니다.
- IMG, BIF, VFD 이미지는 IMA 확장자로 변경해야 합니다.
- 사용방법은 위의 ISO 사용방법과 비슷합니다.
매뉴얼
문제해결
에러메세지
화면에 ChkDsk (아니면 gErr) : xxx 라고 출력됩니다.
- 증상이 해결될 때까지 다음 순서에 따라 하나씩 실행하여 주십시오.
- 조그 스위치를 누른 상태로 PC와 연결하세요.
- 윈도우에서 디스크 검사를 진행하세요.
- 새로운 _ISO폴더를 생성하고 자료를 하나씩 복사해서 증상을 확인합니다.(기존의 _ISO폴더는 이름을 바꾸세요, 이동이 아니라 복사입니다)
- 동일한 증상이 반복된다면 데이터를 백업한 후 HDD를 포맷하여 주세요.
- 최신 펌웨어로 업데이트 해 주세요.
화면에 1st partition 또는 unsupported partition 이라고 나옵니다.
- 펌웨어 종류와 iODD 드라이브의 첫번째 파티션과 맞지 않아서 일어나는 메시지 입니다.
- 위의 처음 세팅 을 확인하세요
bad or N/S HDD
하드 디스크를 읽지 못하는 경우 입니다. 증상이 반복되면 다른 하드 디스크로 교환하세요
too many files
루트 디렉토리나 _ISO폴더안에 32개 이상의 파일/폴더가 있을때 발생하는 메시지 입니다. 서브 폴더를 사용해서 자료를 정리하세요
NO _ISO Folder
iODD 드라이브의 첫번째 파티션의 루트 폴더에 _ISO 폴더를 만드세요
NO - DISC
_ISO 폴더 에 서브폴더나 이미지 파일이 없는 경우 입니다.
Check HDD
Disc Locked
OS 나 프로그램이 실행하면서 광드라이브를 어떤이유로 락킹 시킨상태 입니다. 디스크가 수동으로 빠지지 않게 되는데, 해결책은 iODD 를 재연결 하면 됩니다.
DEFRAG
ISO 파일은 24의 디스크 조각까지 허용되며, VHD 나 RMD 는 조각을 허용하지 않습니다. 그 이상이 될경우에는 디스크 단편화 제거를 위해 디스크 조각 모음을 실행해 주세요.
vDISK Limit
최대 4개의 가상 드라이브를 지원하는데, 그 이상 선택했습니다.
Already Hit
이미 선택된 가상 드라이브를 다시 선택했습니다.
No Use Dynamic
선택한 VHD는 가변식 입니다. 고정식만 지원합니다.
No Use Sparse
가상 드라이브 이미지는 sparse 파일을 지원 하지 않습니다.
QNA
화면에 IODD 2531만 출력됩니다.
- 하드웨어 문제인 경우이며 다음중 하나를 실행하세요
- 조그버튼을 누르고 USB 케이블을 연결한다음 3초간 유지합니다.
- USB포트를 PC의 후면에 꽃습니다.(PC의 전면 전압이 낮은경우)
- USB케이블을 교체합니다.(스마트폰에 사용되는 5핀 케이블도 테스트로 사용할 수 있습니다)
- PC를 재부팅 합니다.
- HDD를 교체합니다. ( HDD에서 소리가 나거나 문제가 있는경우).
- 만약 USB허브를 사용하고 있다면,허브를 사용하지 말고 PC에 아이오드를 직접 연결합니다.
- 다른 PC에 연결해 봅니다.
- 위의 처방에도 이 현상이 지속된다면 A/S 접수 해주세요
가상 드라이브 (VHD, RMD, IMA)를 마운트 하면 자동으로 CD-MODE 로 되고 DUAL-MODE 로 변경하면 쓰기 금지가 됩니다.
- 파일명을 변경하면 됩니다. VHD Tool++ 참조 바랍니다.
가상 드라이브 (VHD, RMD, IMA) 마운트를 해제하고 싶습니다.
- 다음중 하나를 실행하세요
- USB 커넥터 옆의 기능 버튼을 길게 누른다 ( 펌웨어 1555 이상 )
- Menu->Advanced->Umount VHDD
펌웨어 업데이트가 자꾸 실패합니다.
업데이트 방법 을 확인하세요
펌웨어
업데이트 방법
최신
- 2016. 4. 23 - NTFS 버전 1558, FAT32/exFAT 버전 1558
- Menu -> Advanced->Instant Save 기능추가
- 체크 되어있으면 ISO 파일 선택시 로딩정보 바로 저장
이전
- 2016. 3. 28 - NTFS 버전 1555, FAT32/exFAT 버전 1555
- VHD, RMD 모드에서 Rufus 프로그램 지원
- 2014. 6. 2 - NTFS 버전 1288, FAT32/exFAT 버전 1288
- 장기 안정 펌웨어


